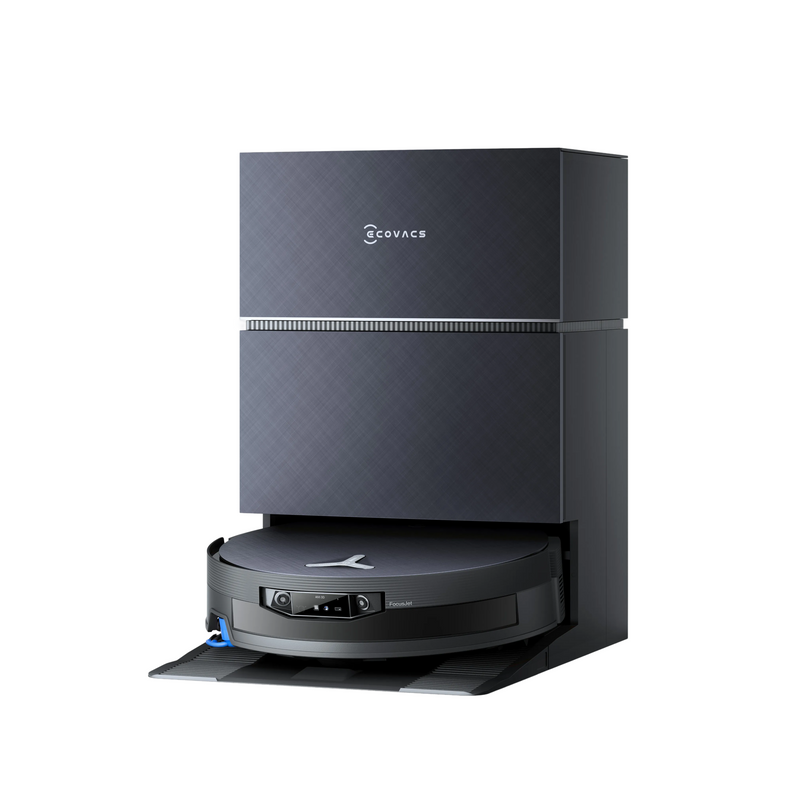
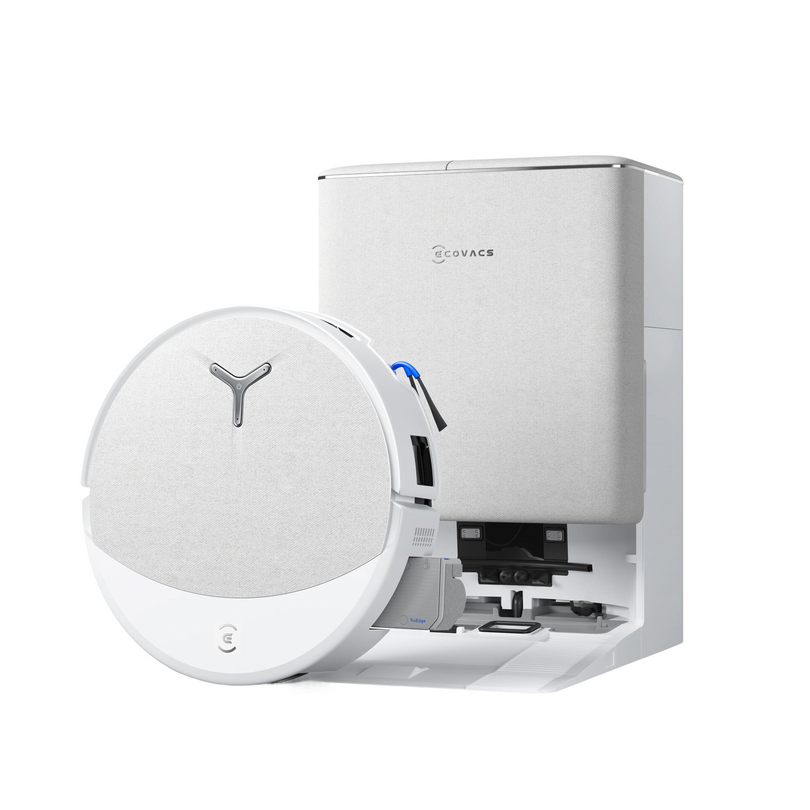
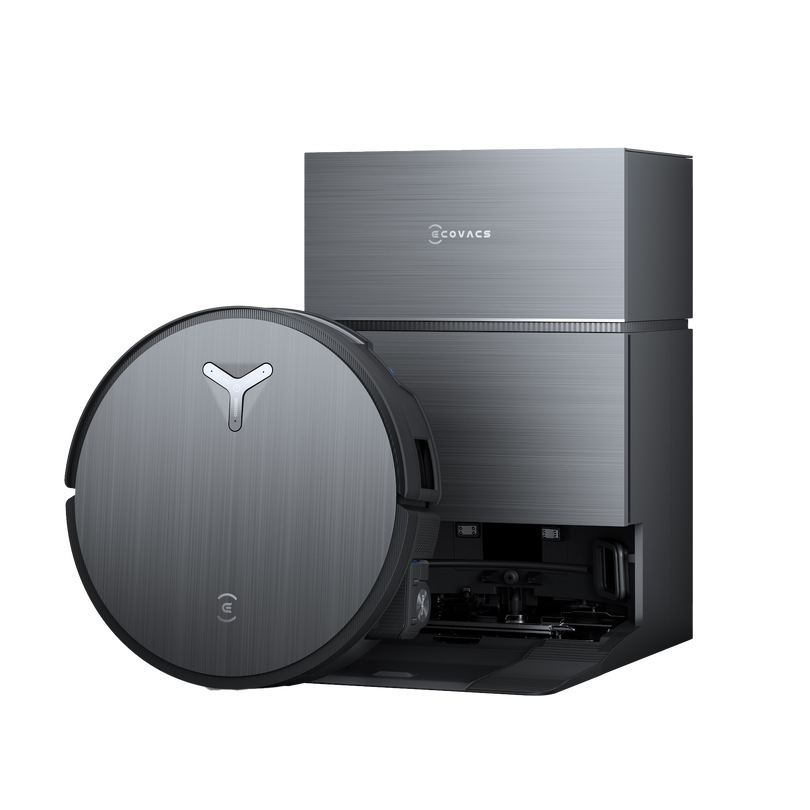
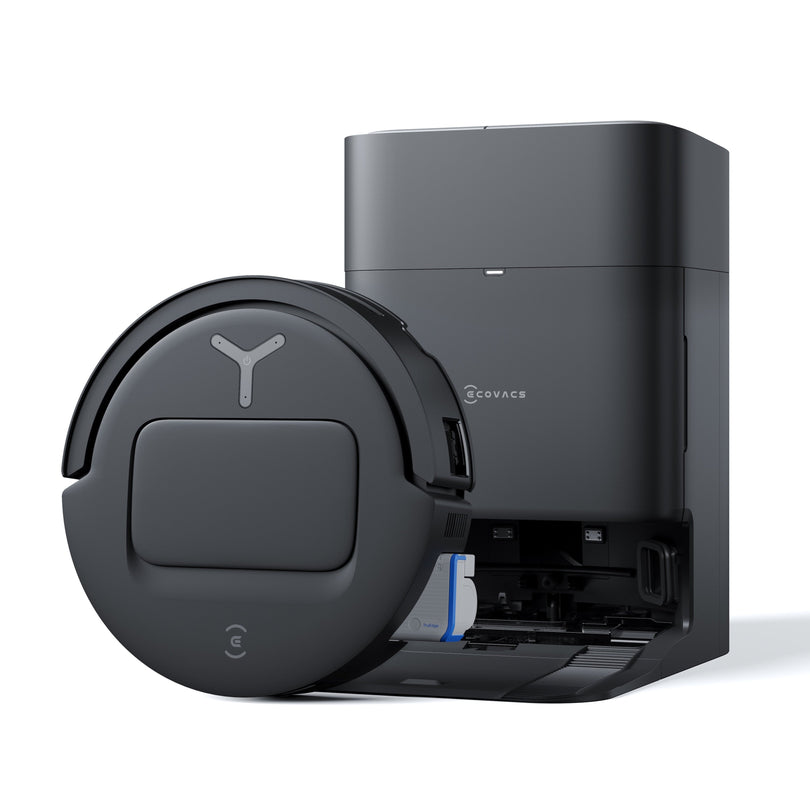

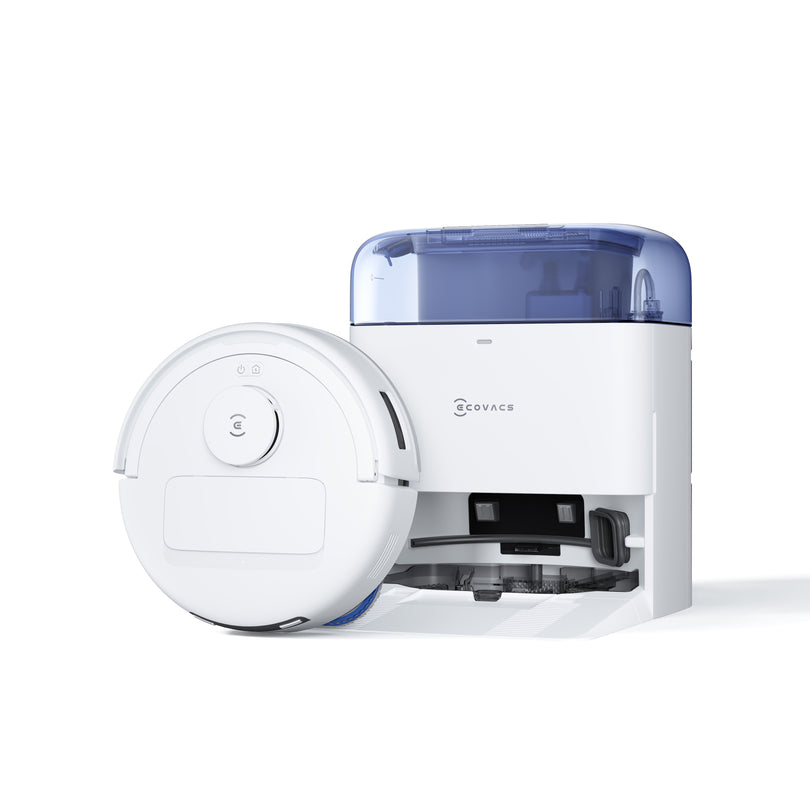


DEEBOT T20 OMNI
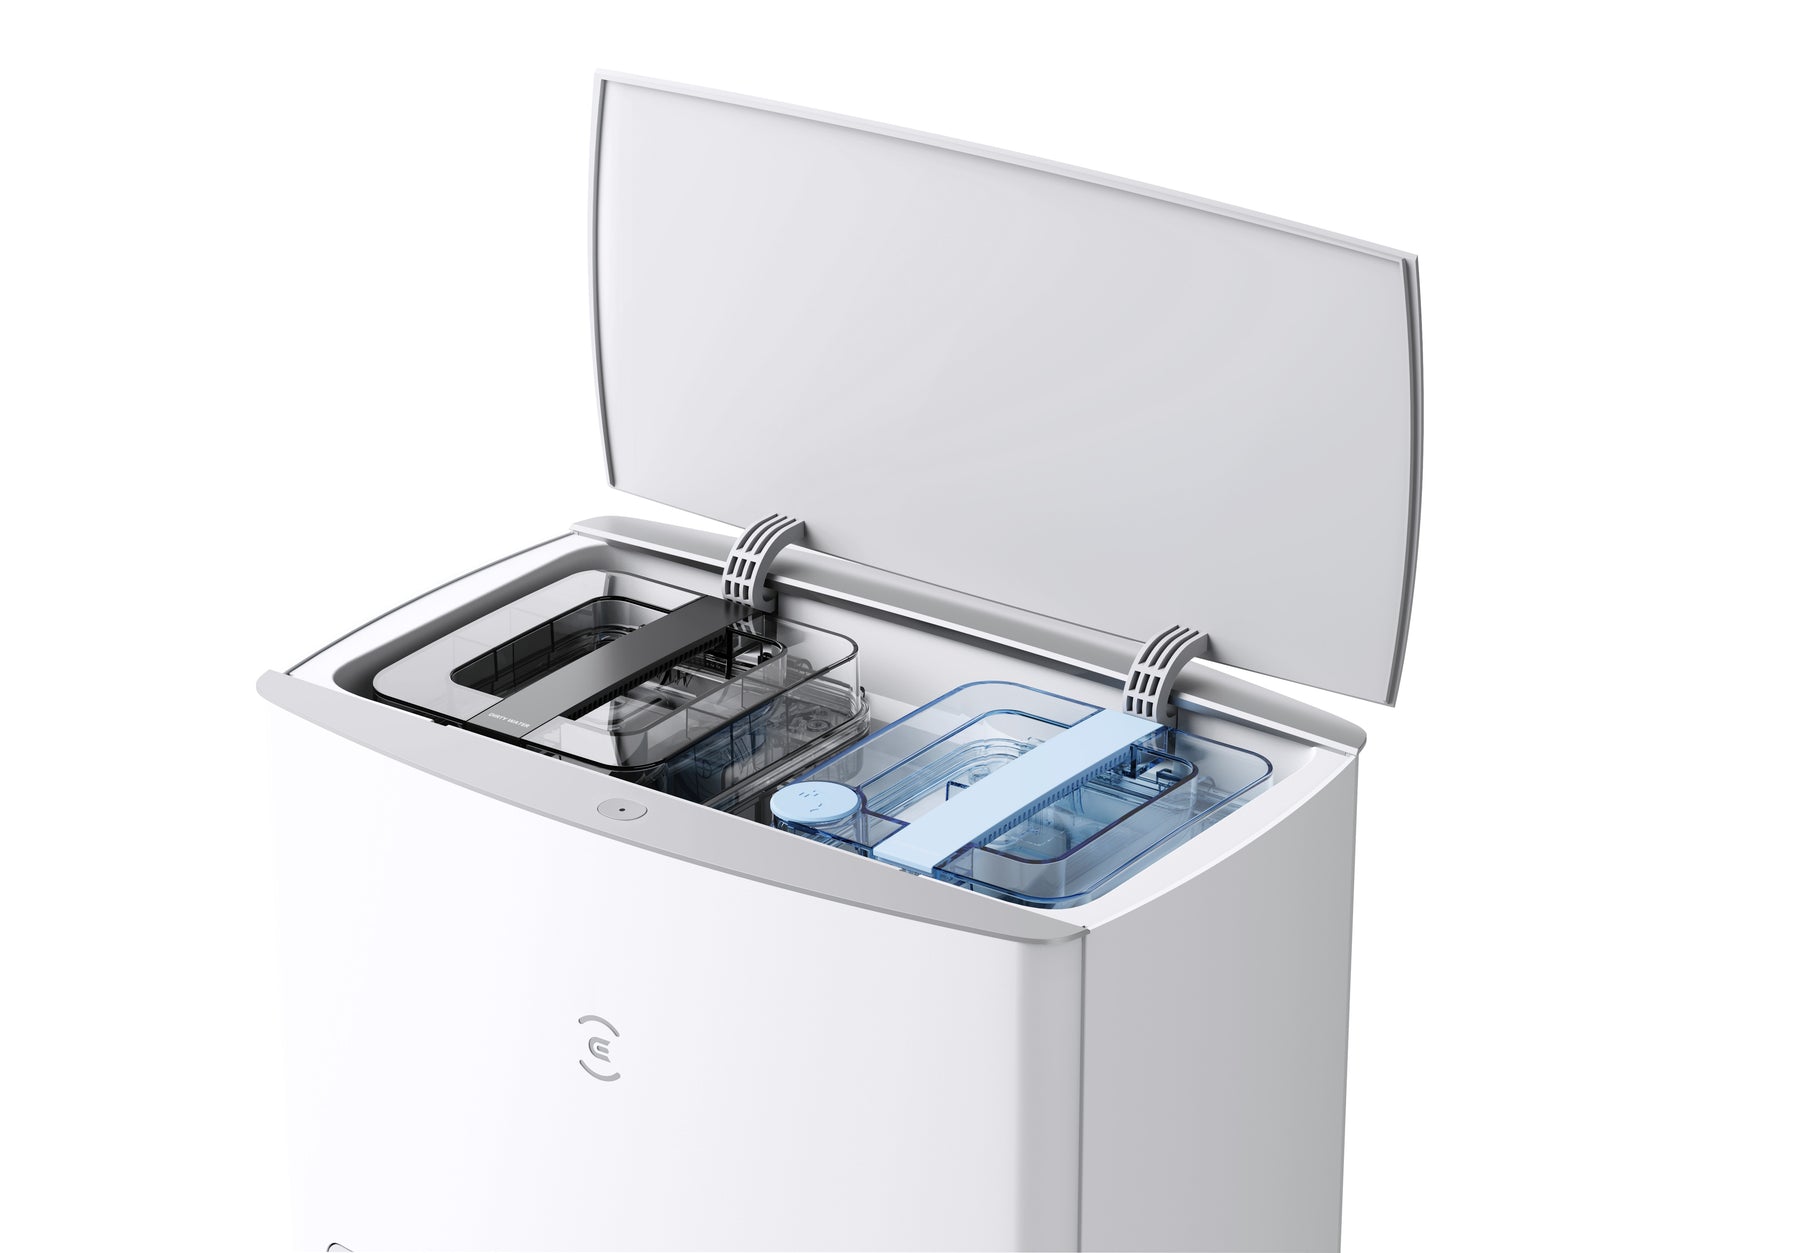
✅The newly upgraded hot water washing rag charging base has a built-in extremely fast heating system. The clean water is spirally heated and quickly heats up to 55°C, the golden temperature, to dissolve stains and deeply clean dirty rags.
✅Comprehensive cleaning effect: Double-sided brush concentrates dust cleaning and covers corners
6000Pa strong suction power, easy to remove crevice residues, rubber roller brush, more effective hair cleaning, rotating pressurized mopping, wiping off floor stains at a high speed of 180 rpm
✅The new deep corner cleaning achieves 60% corner coverage by rotating the body. Say goodbye to manual cleaning of corners. Only clean corners can truly clean the whole house.
✅Seamless antibacterial air ducts and water ducts are completely sterilized throughout the entire process. Random antibacterial filters, antibacterial dust bags, and even the body are fully antibacterial. You can also purchase an additional slow-release silver ion component to feel healthy at any time.
✅Upgrade TrueDetect 3D 3.0
Use structured light technology to flexibly dodge various floor objects and clean the home environment smoothly. You are no longer afraid of being disturbed by objects or damaging furniture. Intelligent visibility
✅ Say "OK YIKO" to clean and dry
ECOVACS's first intelligent AI voice assistant YIKO sound source positioning technology directly realizes intelligent human-computer interaction without the need for third-party speakers. No matter where you are at home, just call "OK YIKO" and you can instantly interact with the computer to complete the work through dialogue.
"OK Yiko, clean my house" - Start the robot to clean your home in automatic mode "OK Yiko, come clean here" - Summon the robot to clean around you in front of you "OK Yiko, stop vacuuming" - Stop cleaning
FAQ
Ready to connect
1. Scan the QR code on the robot, or search for ECOVACS HOME App on Google Play or Apple App Store, and then follow the instructions to download and install Ecovacs Home App. Please allow relevant location authorization (including GPS and GPRS) for this application. 2. Please make sure your smartphone is connected to your home WiFi.
Note: The robot supports 2.4GHz WiFi signal or 2.4GHz/5GHz hybrid network. If your router sends two WiFi signals, please ignore the 5GHz Wi-Fi signal for now. Connect your T20 OMNI with ECOVACS HOME App:
Open the ECOVACS Home App and scan the QR code on the robot to add a new robot. Follow the in-app instructions to complete the network connection. Alternatively, you can add a model manually and connect the robot to the network.
hint:
1. The robot does not support hidden WiFi signals, which means you must see the WiFi signal network name on your smartphone to connect.
2. The connection currently does not support VPN or Proxy servers.
3. The connection does not support network authentication or authenticated networks.
Update time 2023/05/25
1. DEEBOT should be placed on the charging station and must be charged. 2. DEEBOT needs to be charged to 50% (it is recommended to upgrade after 3 hours of charging). 3. Make sure DEEBOT is connected to ECOVACS HOME App and the WiFi signal is good.
4. Enter "Smart Cleaning" > "Settings" > "About DEEBOT" > "Update DEEBOT"
Note: If automatic updates are enabled, DEEBOT will automatically update to the latest version.
Update time 2023/05/25
Before you create a map 1. Open the door to the room you want to map and remove any obstructions you think may interfere with cleaning. Make sure there's enough light so the map covers your entire home. 2. Turn on the power of the robot (remove the host cover and turn the switch to "I"), and then place it directly in front of the charging station. 3. Tap the Recall/Away button on the charging station to have the robot return to recharge itself. Once docked, charging will begin. Quick mapping 1. Confirm that your robot is connected to the ECOVACS HOME App and is online. 1) Using the voice assistant: You can say to the robot: "OK YIKO, quick mapping" 2) Using the app: Open the ECOVACS Home App and go to "Smart Cleaning" > "Quick Surveying"
2. After the surveying and mapping is completed, the robot will inform you that the surveying and mapping is completed. This means the map was created successfully. Notes: (1) When using the voice assistant and the robot receives voice commands, the start button will change from solid white light to flashing blue light. When finished, the light will turn back to white. (2) If the robot is not connected to the network, the quick mapping function cannot be used. However, you can press the start button on the robot to start it, and it will map the environment as it cleans. When finished, the robot will say "Cleaning Complete." This indicates that mapping is complete.
Update time 2023/05/25
1. Confirm that YIKO voice assistant has been enabled in ECOVACS HOME App.
2. You can view YIKO guidance and voice commands in the app. Say "OK YIKO" to wake the robot, then say your voice command, such as "OK YIKO, start cleaning."
Remark:
* YIKO voice commands may be updated. Please refer to the voice commands in the ECOVACS HOME App.
* After the robot is connected to the Internet, you can use YIKO voice commands.
Update time 2023/05/25
1. Please do not place objects near the charging station. Please remove any obstructions. 2. Has the charging station been disconnected from the power source or moved manually? If so, return the charging station to its original location and reconnect the power source. 3. Check whether there is water accumulation on the chassis of the charging station and the surrounding floor. If there is water accumulation, please wipe the charging chassis and surrounding floor with a dry cloth. 4. Check whether the mopping cloth board is installed correctly, and make sure you hear a snapping sound, indicating that it is installed in place. 5. If the robot gets stuck or sounds an alarm while cleaning, please check the robot manually. 6. Check whether the ground where the charging station is located is uneven. If so, place the charging station on flat ground. 7. Check whether the route is blocked, such as whether the door to the room where the charging station is located is closed. 8. Place the robot directly in front of the charging station and hold down the start button to see if you can return to the charging station. If it doesn't work, please contact customer service. Note: 1. It is recommended that the robot start cleaning from the charging station. 2. When the robot is cleaning the mop, the "Return to Charging Station" button on the app will be gray and unavailable. Please wait until the current job is completed and try again.
Update time 2023/05/25
Please first check whether the indicator light on the charging station is flashing. If it is flashing, please disconnect the power supply of the charging station, then reconnect and turn on the power before troubleshooting. 1. Open the charging station cover, take out the waste water tank, open the water tank cover, and make sure the sealing plug is installed correctly. Wait about 10 seconds before closing it. 2. Press down the sealing plug of the waste water tank inside the charging station. Place the waste water tank back into the charging station and press it down, then try again. 3. Press and hold the start/stop button for 5 seconds to see if the machine will recycle waste water. 4. If the waste water cannot be recycled, please pick up the robot and check whether there is debris blocking the suction port in the cleaning tank in the charging station. If debris blocks the suction port, clean it. 5. If the robot prompts "The cleaning tank is full" when the cleaning tank is out of water, please check whether the water level sensor is dirty, and wipe the water level sensors on both sides of the cleaning tank with toilet paper.
Update time 2023/05/25
Can't lift the mopping board? 1. Check whether the carpet cleaning strategy is set to "Automatic".
Open the app and go to "Smart Cleaning" > "Carpet Cleaning Strategy" and select "Automatic". 2. Confirm the cleaning mode of the robot: (1) In the "vacuum" mode, the mopping cloth plate will be raised. This is normal.
(2) In "mopping" mode, the mopping cloth will automatically lift only when a carpet is detected. (3) In the "vacuum and mop" mode, the mopping cloth will automatically lift only when a carpet is detected. (4) In the "vacuuming and mopping" mode, the mopping cloth plate will be raised during the vacuuming phase and lowered during the mopping phase. They will only lift again when carpet is detected. 3. If your problem is not related to the above situation, please try the following steps: (1) Check whether there is any debris stuck in the mop board. If there are any debris, clean them. (2) Check whether the mopping board is correctly installed on the robot. If not, please reinstall. When DEEBOT is cleaning and the "auto" strategy is selected, why does the robot still hit the floor mat and get stuck on the carpet? Under the "auto" strategy, the robot uses carpet detection sensors to detect carpets and then lifts the mopping board. The surface of some floor mats is hard, so the robot may not be able to detect the mat; or the mat is too thin, so the sensor may not be able to detect it. In these cases, the robot may hit the floor mat. The mopping board lifts up when sweeping carpets, but the robot can get stuck when it hits a curled carpet corner. It is recommended that you use double-sided tape to tape the curled corners to the floor, or use the virtual wall feature to avoid this area.
Update time 2023/05/25
1. Turn off the power of the robot, turn over the body, and then wipe the driving rollers with a dry cloth. 2. Use a clean, dry cloth to wipe away any accumulated water on and around the charging chassis of the charging station. 3. Check whether the mopping cloth board is installed correctly, and make sure you hear a snapping sound, indicating that it is installed in place. 4. Place the robot in front of the charging station, then press and hold the start button to let the robot return to the charging station automatically. Reminder: Do not add any other cleaning fluid. When using ECOVACS cleaning solution, follow the directions on the bottle.
Update time 2023/05/25
Open the ECOVACS HOME App and go to "Smart Cleaning" to set the drying time.
Update time 2023/05/25
1. Confirm that your DEEBOT is connected to the ECOVACS HOME App and the YIKO voice assistant has been enabled in the app.
2. When saying "OK YIKO" to DEEBOT, please use a more standard pronunciation so that YIKO can understand you. You can follow the voice assistant guidance in the app.
3. If there is too much noise or DEEBOT is far away from you, YIKO may not be able to recognize your voice commands.
4. Make sure your home WiFi signal is good and the ECOVACS HOME App and DEEBOT firmware versions are kept up to date.
Note: YIKO voice assistant cannot function during video and voice calls.
If the problem persists, try resetting your DEEBOT and try again.
Update time 2023/05/25
1. Turn off the power of the robot, then turn the robot over so that the bottom is facing up. 2. Press and rotate the drive roller to clear any entangled debris. 3. Press and rotate the drive roller, then wipe the surface with a semi-dry cloth.
Update time 2023/05/25
Set the mopping cloth cleaning interval: Open the ECOVACS Home App and go to "Smart Cleaning" to set the mopping cloth cleaning interval. Note: The cleaning interval of the mopping cloth can be adjusted during cleaning. If the cleaning interval is adjusted, the current cleaning interval will first be based on the previously set interval. The next time the robot returns to its charging station, the robot will clean the mop based on the most recently updated interval.
Update time 2023/05/25
1. The robot starts cleaning at a fixed time, but no scheduled cleaning has been set. What should I do? Open the ECOVACS Home App and click "My Settings" (small house icon) in the upper right corner to check whether scheduled cleaning has been set; if so, please delete it. 2. The robot starts cleaning at a random time, but no scheduled cleaning has been set. What should I do? Check whether the continue cleaning function is turned on. If this feature is enabled, the robot will adjust its charge time based on remaining tasks and continue any unfinished tasks.
Update time 2023/05/25
Plush carpets may get wet when the robot cleans them. In the app, go to "Smart Cleaning" > "Map" > "Edit Map" > "Virtual Wall" and set the virtual wall as needed. Why do robots wet carpets? When cleaning, if the carpet detection sensor detects carpet, the mopping cloth will lift up. The mopping cloth takes a moment to lift. However, the robot won't stop moving, which means it may move a short distance on the carpet before the mop is fully lifted, causing the carpet to become wet.
Update time 2023/05/25
Can't continue collecting dust? 1. Confirm whether the dust bag is installed correctly and the dust box is completely closed. 2. Confirm that DEEBOT is correctly placed on the charging station. Dust bag not detected? 1. Open the dust box and check whether the dust bag is installed. If there is no dust bag, please install it correctly. 2. If there is a dust bag, remove it and reinstall it. After replacing the dust bag with a new one, the robot continues to display that the dust bag is full. 1. Shut down the robot and restart it. Disconnect power from the charging station and connect it again. 2. Check the robot’s firmware version and update it to the latest version. 3. Confirm that the robot is charging. Reinstall the dust bag.
Update time 2023/05/25
Unable to update firmware? 1. Check whether DEEBOT is charging. 2. Check the remaining battery power of DEEBOT. If the DEEBOT battery is low or exhausted, the firmware upgrade cannot be performed. It is recommended to upgrade after 3 hours of charging. Firmware cannot be updated? 1. Please place DEEBOT and charging station in a location with strong network signal. If DEEBOT is located in a location with weak signal, download timeout may occur and the upgrade may fail. 2. Check whether the charging station can control the robot. You can tap the start/pause button on the charging station and watch the results. If there is no response, the upgrade will fail. You can try pairing the robot and charging station again, and then try upgrading again after pairing is successful.
Update time 2023/05/25
1. Check if "Continue Cleaning" is enabled in the app. 2. "Continue Cleaning" cannot be triggered when "Do Not Disturb" is enabled. 3. If the robot returns to the charger and triggers an alarm, it will not be able to trigger the continued cleaning function. 4. Once the continue cleaning function is triggered, the robot will not be able to restart or restore to factory settings. Note: "Continue Cleaning" is only valid in "Auto Mode".
Update time 2023/05/25
You can view charging station information in the app. You will be notified when the clean water tank level in the charging station is too low or the waste water tank is full. (The button indicator on the charging station will also flash red) You can also use the OK YIKO voice assistant to give voice commands to DEEBOT. You can say: "OK YIKO, clean mop." The robot will then start cleaning the mop. You can also do this through the app by going to "Charging Station" > "Cleaning Mop". Please read the app for more voice commands.
Update time 2023/05/25
Note: Every time you start cleaning, wet the mopping cloth with cold water and then wash it with hot water. 1. Confirm that the robot is connected to the ECOVACS HOME App. 2. Open the app and go to "Smart Cleaning" > "Charging Station". Make sure the hot water option for cleaning the mop is turned on. If this option is turned off, hot water will not be supplied to clean the mop. 3. Check whether there is enough water in the clean water tank and add water if necessary. Notes: (1) The hot water cleaning button is on by default. (2) If you use the automatic cleaning function of the charging station, the water will be cold, which means you cannot use the hot water cleaning function. (3) Heating clean water is a dynamic process, and during the initial stages of the cleaning process, the temperature will decrease slightly. (4) If the water temperature is too high, this function will be temporarily turned off to avoid injury.
Update time 2023/05/25
1. Check software and phone settings
(1) Scan the QR code on the robot to download the latest version of the application, and confirm that the application's location permissions (including GPS\GPRS permissions) have been enabled in the phone settings. Note: For iOS 14.1 and above, please open the phone settings and go to "ECOVACS Home" > "Enable local network permissions", then tap "Location" again to confirm that "Precise Location" is enabled. (2) Temporarily disable 4G/5G mobile data services, confirm that the phone is connected to your home Wi-Fi network, and open other applications/browsers to see if you can connect to the Internet. (3) If you have anti-virus software or VPN software installed on your phone, please turn it off. 2. Check router settings
(1) It is recommended that you set the Wi-Fi name and password to English letters or numbers, and avoid using special symbols and Chinese characters. (2) If you use a dual-band router at home, you should pay attention to the following two points: A. If the router is set to "Dual-band priority" or "Dual-band integration" (only one Wi-Fi signal), you can directly set the network road
B. If the router is configured to send out two Wi-Fi signals, please temporarily ignore the Wi-Fi signal of the 5G band in the mobile phone wireless network list (3) During and after network setup, the router settings are Cannot hide Wi-Fi signal. 3. Network-related precautions Follow the application prompts to connect to the network. Notes: (1) When entering the Wi-Fi password, confirm that the password matches your home Wi-Fi password. (2) Robot network settings currently do not support VPN or Proxy servers. Networks that require web verification and authentication are also not supported. (3) If "ECOVACS_XXXX" appears in the connected network but cannot join the network, please power off the robot and restart it. Wait 2 to 3 minutes and start again. Try reconnecting to the network. 4. If the above steps don’t work, you can try using a hotspot. (1) Prepare two mobile phones, one of which has downloaded the latest version of the application and enabled location permission, and the other has turned on the mobile data sharing hotspot. Follow the prompts in the app to complete the connection steps. (2) If you can connect to the hotspot, please open the app and go to "Settings" > "DEEBOT Information" > "Wi-Fi Management", then tap "+" to manually add a wireless network.
Update time 2023/05/25
1. Check that the cord is plugged into the electrical outlet correctly. You can also try using a different outlet. Also check that the wires are plugged into the back of the charging station correctly. 2. Remove the robot's host cover and confirm that the power switch is pushed to "I" to turn on the robot's power. 3. Check whether DEEBOT is powered on normally. (1) If it can be turned on: Please place the robot directly in front of the charging station, press and hold the AUTO button on the robot for 3 seconds, and let the robot return to the charging station to charge itself. Once connected to the charging base, the robot's AUTO button will flash white. Please try using the robot again in 4 to 5 hours. (2) The robot cannot be powered on: If the robot cannot be powered on, please manually push the rear end of the robot into the charging station to clean the water tank. Once connected to the charging base, a voice prompt will play and the robot will begin charging. The robot's AUTO button will flash white. Check after 4-5 hours of charging. 4. If DEEBOT flashes red during operation, please follow the voice prompts to troubleshoot the problem. 5. Check whether you are using original mopping cloth. If not, it is recommended to replace it with the original mopping cloth and try again. 6. Check the cleaning water tank of the charging station and see if the charging electrodes are dirty. Please clean and try again. If the problem persists, please contact ECOVACS Customer Service.
Update time 2023/05/25
After the map is created, if the map is confusing/overlapping/distorted, or inconsistent with the original map, you can try to restore the map. 1. Open the app and click "Map Settings" > "Restore Map". 2. If the map recovery fails, it is recommended that you delete the map and use the quick mapping function to create a new map. Notes: (1) Restoring a map will restore the map to the previously saved version. (2) After successfully restoring the map, reservations and some settings will be lost. The 3D map will also be updated.
Update time 2023/05/25
How to tell if the robot missed any areas while cleaning? Missing area definition: When the robot performs vacuuming and mopping in "automatic mode" or "area mode", wait for the robot's voice prompt to indicate that cleaning has been completed. If any area is not cleaned, we can consider it a missed area. If there are missed areas, we can do this: Confirm whether the missed areas are always the same A. Same areas: (1) Please first confirm whether the "Bypass Carpet" cleaning mode in the app is set to avoid carpets. If a carpet or floor mat is detected at the entrance to an area, the area will be avoided. Please try changing the mode to the "Automatic" strategy. (2) Check entrance areas with thick carpet or floor mats. If the carpet/mat thickness or threshold height exceeds 2 cm, the robot will not pass by and will give up cleaning the area. It is recommended that you make the necessary adjustments. B. Different areas: (1) Do not follow the robot when cleaning, because it will regard you as an obstacle. This results in areas being missed due to obstacle avoidance. (2) If many items are placed in the cleaning area, areas may be missed due to attempts to avoid the items. Please remove these items and observe if there are any changes.
Update time 2023/05/25
1. Let the robot start from the charging station, complete a complete cleaning cycle, and observe again. 2. If it is still messy, you can try the following: (1) Check whether the TrueDetect 3D and D-ToF components are dirty. If so, clean it with a clean cloth. (2) Check whether there are many obstacles in the room. When the robot avoids obstacles, the route may look a little confusing. Please remove the obstacles to make it easier for the robot to follow the route. (3) Check whether the driving roller is dirty. If so, wipe it clean with a dry cloth. Note: Do not add any other cleaning fluid to the clean water tank, otherwise it may cause the robot's rollers to slip.
Update time 2023/05/25
1. Check whether the robot's anti-collision protection strip has been removed. If not, remove it first. 2. Turn off the power of the robot, turn it over and gently turn it upside down.
3. Press and rotate the drive roller to clear any entangled debris.
Update time 2023/05/25
1. If DEEBOT has just been upgraded or restarted, it will take some time to respond. Please wait 3 minutes before use. 2. The robot may be too far from the base charging station. In this case, it is recommended to use an app to control the robot.
3. If the robot is close to the charging station, please check the connection status in the app first. If the connection is lost, try pairing the robot with the charging station again in the following ways:
1) Reconnect the power supply to the charging station 2) Restart the robot 3) Place the robot into the base charging station, please wait 10 seconds while charging, the robot will re-pair with the charging station. You can also check your connection status in the app settings.
Update time 2023/05/25
1. If you have only one router at home and the robot goes offline after successfully connecting to the app, please follow the instructions in the app to troubleshoot.
2. If there are multiple routers at home, and the routers have different names and passwords, and the robot goes offline after successfully connecting to one of the routers:
1) The robot should connect to each router in turn, and then automatically switch to the WiFi of the relevant router in the cleaning area (it will only be temporarily offline during the switching period).
2) When DEEBOT is online, you can also add other router WiFi through the application settings (WiFi management).
3. If you have a mesh WiFi router system (WiFi router extender), please turn off the extender first and then connect the robot to the main WiFi router. After successfully completing the connection, please turn on the extender and the robot will automatically move to the network covered by the extender.
Update time 2023/05/25
Please confirm that the robot is connected to the ECOVACS HOME App. Open the app to configure related settings: Go to "Smart Cleaning", tap "Cleaning Preferences", and select "Vacuum", "Mop", "Vacuum and mop" or "Vacuum and then mop". You can also use the OK YIKO voice assistant to instruct the robot which tasks to perform. Friendly reminder: 1. You can set the frequency of "vacuuming", "mopping", and "vacuuming and mopping" tasks. 2. If it is a "vacuuming and mopping" task, the frequency cannot be set, and the cleaning will follow the same set route.
Update time 2023/05/25
Robot scheduled cleaning settings: Open the ECOVACS HOME App and go to "Smart Cleaning" > "Scheduled Cleaning" to make related settings, such as adding or deleting appointments.
Update time 2023/05/25
Removing and cleaning the mopping cloth plate 1. Turn the robot upside down and place it on a soft floor mat. 2. Rotate the mopping cloth outward (make sure the mopping cloth is lifted). 3. Hold the mopping board with both hands and lift it slightly to remove it. Next, you can peel the washable mop cloth from the mop board. 4. Clean and air-dry the mopping cloth before using it again. Installation of mopping cloth and mopping cloth board 1. Turn the robot upside down and place it on a soft floor mat. 2. Align the mopping cloth with the mopping cloth board, then press the mopping cloth into the cloth board, and then install the mopping cloth board on the robot. Confirm that you hear a snapping sound, indicating that it has been installed correctly.
Update time 2023/05/25
1. Open the charging station cover and take out the waste water tank. Open the waste water tank cover and clean out the waste water. (If the bottom of the water tank is still dirty, you can use a cleaning tool to clean it.) 2. Open the charging station cover and take out the clean water tank. Open the cover of the clean water tank, take out the filter material assembly and clean the filter material. Put it back after cleaning.
Update time 2023/05/25
1. Turn off the DEEBOT and turn it over with the bottom facing up. 2. Press down to remove the roller brush cover and remove the main cleaning brush assembly. 3. Clean the debris entangled on the main cleaning brush (you can also disassemble and clean the accessories at both ends of the main cleaning brush) 4. Install the main cleaning brush assembly onto the robot. When you hear a snapping sound, it means it has been installed correctly. Tip: Please rotate the roller brush after installation, and check whether the roller brush can rotate smoothly before installing the roller brush cover.
Update time 2023/05/25
1. Turn off the DEEBOT and turn it over with the bottom facing up. 2. Gently pull up on the side cleaning brush and remove it. 3. Clean the bearings and remove any tangled debris from the side cleaning brush. 4. Push the side cleaning brush back into its mounting slot. When installed correctly, you will hear a snapping sound. Note: The color of each side cleaning brush should match its mounting slot.
Update time 2023/05/25
1. Remove the main unit cover of the robot and take out the dust box. 2. Open the dust box latch and pour the contents into the trash can. 3. Remove the filter element assembly. 4. Clean the dust on the main filter material. (Note: Both the inside and outside need to be cleaned) 5. Tap the filter element assembly to remove dust, and then clean the dust box with water. 6. After cleaning is completed, replace the filter element and insert the dust box back into the robot. Note: If cleaning with water, please place it in a ventilated place to dry before use.
Update time 2023/05/25
1. Confirm that DEEBOT has successfully connected to the application and is online. 2. Open the app and go to "Smart Cleaning" > "Settings" (in the upper right corner) > "DEEBOT Information" > "Wi-Fi Management", then tap "+" to add multiple Wi-Fi connections .
Update time 2023/05/25
The "Map Management" function cannot be used until the surveying and mapping is completed. The map will be automatically saved after mapping is completed. You can create up to 3 permanent maps and 1 temporary map. You can switch between maps manually. Open the app, go to "Smart Cleaning" > "Map Management", then tap the saved map to set it up. 1. Quick surveying and mapping, map naming, map deletion, map backup and restoration (1) The map will be automatically backed up after completing surveying and mapping. (2) If you manually edit the map later (such as setting up a virtual wall) but do not back it up manually, when you restore the map, it will be restored to the original version. (3) If you manually backed up the map after editing, if you restore the map, you will revert to this version. 2. Virtual wall: Click on the saved map, and then select the map editing function to make virtual wall-related settings. Note: Do not set up a virtual wall around the charging station. When adding a virtual wall, DEEBOT will pause the operation and resume the operation after the addition is completed. 3. Area type: "Map Management" > "Saved Maps" > "Area Type" 4. Area Partition: "Map Management" > "Saved Maps" > "Region Partitions" 5. Area Merger: "Map Management" > "Saved Maps" > "Area Merge"
Update time 2023/05/25
Replacing the dust bag 1. Press the release button under the dust box. 2. Remove the dust bag and discard. 3. Wipe the dust box with a dry cloth and install a new dust bag. 4. Close the dust box.
Update time 2023/05/25
Scan the QR code on the robot or search for ECOVACS HOME App on Google Play or Apple App Store, then follow the instructions to download and install the app. hint:
* Please follow the instructions in the app to complete registration, login and WiFi connection. * Before adding a new robot, please make sure your phone is connected to your home WiFi.
Update time 2023/05/25
If your robot is connected to the ECOVACS Home App, please open the app and go to "Smart Cleaning" > "Settings" > "Child Safety Lock" to turn this feature on or off. Note: When the "child safety lock" is turned on, the charging station button and the robot's start/pause button will be locked, and the button indicator light will go out.
Update time 2023/05/25
After the 3D map mapping is completed, you can use the "Home Furnishings" function. Open the app and go to "Smart Cleaning" > "Map Management" > "Home Furnishings" to make relevant settings: 1. "Home Furnishings" > "Indoor Furniture" > Select the furniture you want to add (such as a bed) > Select the size Adjustment. 2. "Home Furnishings" > "Floor Material" > Adjust area size > Select floor material. 3. "Home Furnishings" > "Exterior Walls" > Select the exterior wall boundary and adjust the size if necessary (if a red line appears, it means you cannot perform this action).
Update time 2023/05/25
Butler Mode 1. Go to "Smart Cleaning" and select "Butler Mode". 2. This mode can only be used after surveying and mapping is completed. In "Butler Mode", the robot automatically adjusts suction power and other functions according to the room type. Area Cleaning 1. This mode can only be used after surveying and mapping is completed. 2. After the mapping is completed, the robot will divide the map into areas for cleaning. 3. Select the area to clean based on your needs. In "Cleaning Preferences", you can choose the cleaning mode, cleaning frequency, suction power, etc. 4. Select multiple areas to clean. DEEBOT will clean the area sequentially according to the selected cleaning order (which must be set every time). 5. The suction power cannot be adjusted in the "vacuum" and "mopping" modes; the frequency cannot be adjusted in the "vacuum and then mop" mode. How to use: 1. Use voice assistant commands: For example, you can say to the robot: "OK YIKO, clean room A" 2. Use the app: (1) If you have set the cleaning order in "Cleaning Preferences", DEEBOT This order will be given priority. (2) If the robot has started cleaning, the cleaning mode and frequency cannot be changed. You can adjust the suction level on the fly as needed. Furniture area cleaning 1. This function can only be used when surveying is completed and the map contains furniture (you can add furniture through "Map" > "Home Furnishings"). 2. Select the cleaning mode (such as vacuuming), frequency and suction power in "Cleaning Preferences". 3. The suction power cannot be adjusted during mopping; the frequency cannot be adjusted in the "vacuum and then mop" mode. Customized Cleaning 1. After the surveying and mapping is completed, you can use "Customized Cleaning". "Custom cleaning" can only be set within the map range. 2. One or more custom areas can be added to the map. DEEBOT will clean areas in the order they are added. 3. Select the cleaning mode (such as vacuuming), frequency and suction power in "Cleaning Preferences". 4. The suction power cannot be adjusted while mopping; the frequency cannot be adjusted in the "vacuum and then mop" mode.
Update time 2023/05/25
1. Open the charging station cover and remove the cleaning brush. 2. Press and hold the charging station's start button for 5 seconds. The robot will automatically leave the charging station and water will automatically flow out of the cleaning tank. 3. Use a cleaning brush to clean the sink. 4. After cleaning is completed, press and hold the start button of the charging station for 5 seconds, and the cleaning tank will drain the waste water. 5. Place the robot in front of the charging station, press and hold the start button, and let the robot return to charge itself. 6. Open the charging station cover, take out the waste water tank and pour out the waste water. Notes: (1) Before use, please make sure there is enough water in the clean water tank. (2) You can perform the automatic cleaning function as many times as needed.
Update time 2023/05/25
Set up custom scenario cleaning 1. Open the app and go to "Smart Cleaning" > "Custom scenario cleaning" 2. "Custom scenario cleaning" > "Create scenario" > Select the cleaning mode; "Region" > Select the cleaning mode you want to customize specified area, tap Edit to set the cleaning frequency and suction power, then tap Save. 3. "Customize Scenario Cleaning" > "Create Scenario" > Select a cleaning mode; "Furniture" > Select the furniture you want to customize, tap "Edit" to set the cleaning frequency and suction power, and then tap "Save". Set the cleaning sequence 1. Open the app > Go to "Smart Cleaning" > Set the cleaning sequence.
Update time 2023/05/25